
Minimally invasive surgery illustration is the discipline of translating laparoscopic and robotic surgical workflows – trocar placement, instrument articulation, and internal anatomical access – into medically accurate visual diagrams. These illustrations serve surgeons, medical publishers, device manufacturers, and patients who need to understand procedures that occur through small incisions and are otherwise invisible to the naked eye. Because the surgery itself happens on a screen rather than an open field, illustration becomes the primary tool for teaching, documenting, and marketing these techniques.
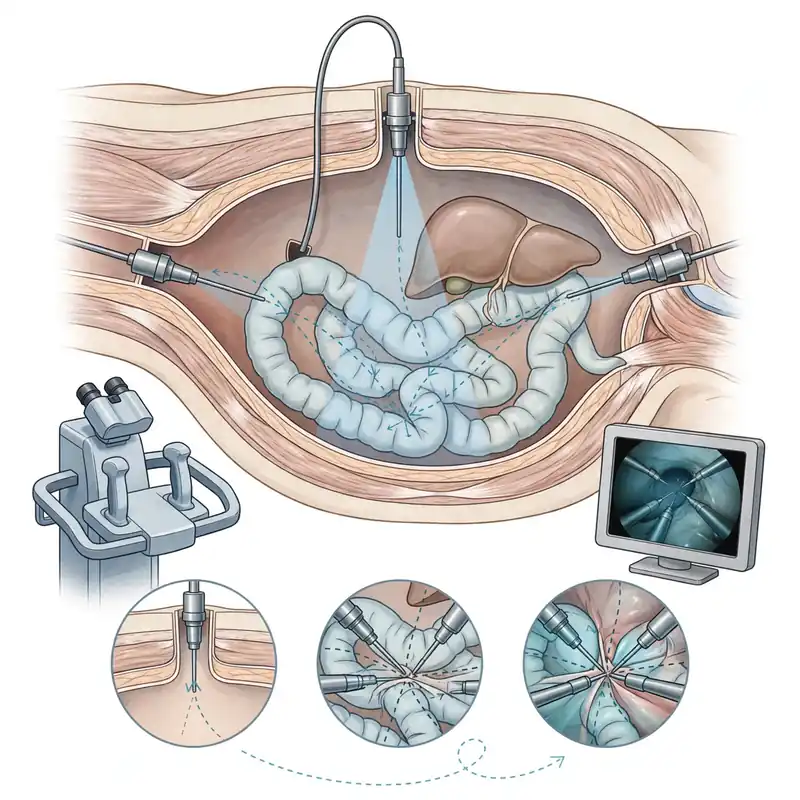
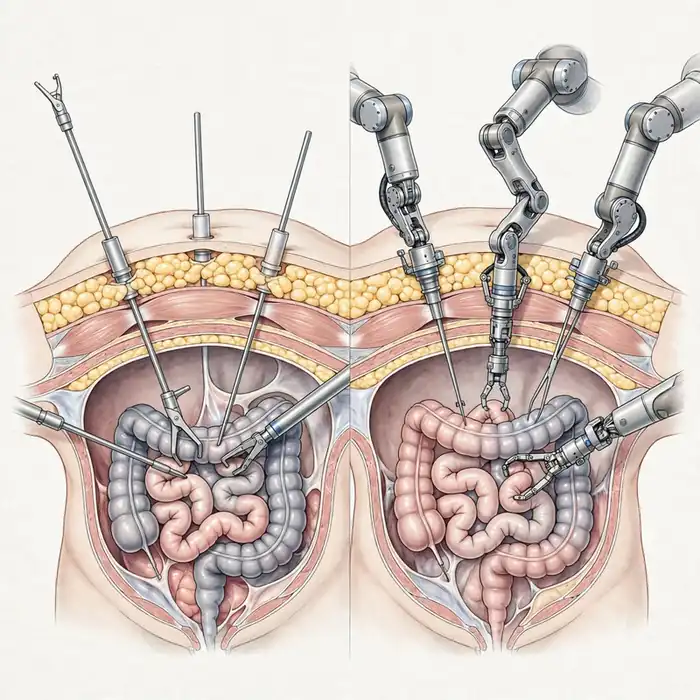
Surgical training has moved almost entirely away from open-cavity procedures toward keyhole and console-based techniques, and that shift has created a parallel demand for artwork capable of explaining what a camera feed alone cannot. A well-constructed minimally invasive surgery illustration doesn’t just recreate what a laparoscope sees; it layers in cross-sectional anatomy, instrument trajectories, and procedural sequencing that no single camera angle could ever capture. For institutions building out this kind of visual library, working with a dedicated custom medical illustration and 3D surgical visualization service ensures every diagram holds up to peer review, regulatory scrutiny, and classroom use alike.
This guide walks through what minimally invasive surgery illustration actually involves, how laparoscopic and robotic diagrams differ, the production process behind them, and the mistakes that most often undermine accuracy or clarity.
What is Minimally Invasive Surgery Illustration?
Minimally invasive surgery (MIS) illustration is a specialized branch of medical visualization focused on procedures performed through small incisions, using cameras, long instruments, or robotic arms instead of a fully open surgical field. Unlike traditional open-surgery illustration, where an artist can depict a wide anatomical view with visible organs and tissue planes, MIS illustration must reconcile two realities at once: a narrow endoscopic viewpoint and a broader anatomical context the viewer actually needs to understand.
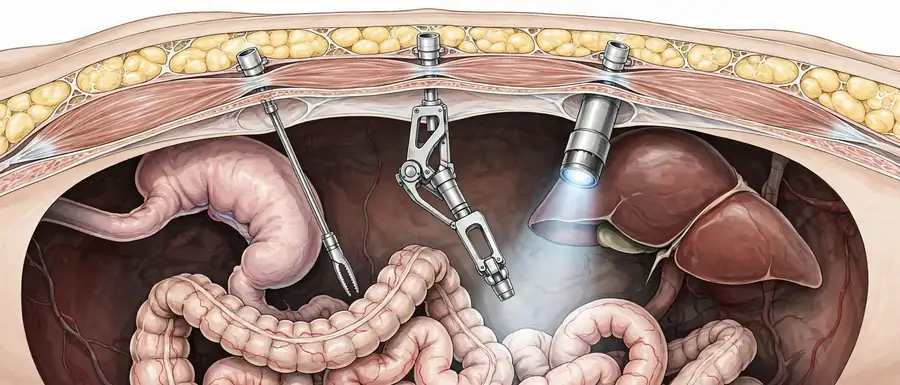
In practice, this means an illustrator often builds a hybrid image – part laparoscopic camera view, part cutaway cross-section – so the reader can see both what the surgeon sees and what’s happening beneath the surface. This hybrid approach is one of the clearest indicators of experience-driven expertise in this niche, since it requires fluency in surgical technique, camera optics, and classical anatomical rendering simultaneously.
Quick definition: Minimally invasive surgery illustration depicts laparoscopic, endoscopic, or robotic-assisted procedures through diagrams that combine external instrument positioning with internal anatomical detail, typically for education, publication, patient consent, or marketing purposes.
Why Laparoscopic and Robotic Procedures Demand Specialized Illustration
Open surgery illustration and MIS illustration are not interchangeable skill sets. A talented general medical illustrator without laparoscopic or robotic-console experience will frequently misjudge instrument scale, port placement geometry, or the working angles a real system permits. Consequently, most publishers and device companies now specifically brief for MIS experience rather than assuming any medical illustrator can produce these diagrams accurately.
Laparoscopic Surgery Illustration
Laparoscopic illustration centers on a handful of recurring visual elements: trocar and port placement on the abdominal wall, the pneumoperitoneum (the insufflated working space), the laparoscope’s field of view, and the manual instruments – graspers, scissors, staplers – operated by the surgeon’s hands outside the body. Because laparoscopic instruments pivot around a fixed port, their range of motion is mechanically limited compared to robotic wrists, and illustrations need to reflect that constraint accurately rather than showing implausible angles.
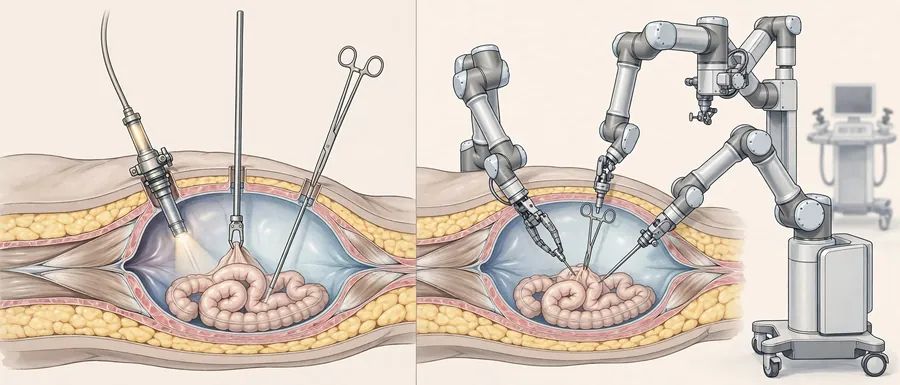
Typical laparoscopic illustration use cases include:
- Port placement diagrams for surgical planning and resident training
- Step-by-step procedural sequences (for example, laparoscopic cholecystectomy or appendectomy)
- Cross-sectional views showing instrument depth relative to organs
- Comparative before-and-after diagrams for patient consent materials
Robotic Surgery Illustration
Robotic-assisted procedures, most commonly associated with systems like the da Vinci platform, introduce additional visual complexity: a surgeon console physically separated from the patient, a patient-side cart with multiple robotic arms, and wristed instruments capable of far greater articulation than manual laparoscopic tools. Illustrating robotic surgery accurately means depicting arm docking angles, instrument wrist rotation, and often a split-view showing both the console interface and the patient-side field.
Robotic illustration is frequently commissioned by:
- Device manufacturers documenting arm and instrument specifications
- Hospitals building patient education material explaining robotic-assisted procedures
- Academic publishers illustrating surgical technique papers
- Training programs building simulation and onboarding materials for new console operators
Laparoscopic vs. Robotic Illustration: A Comparison
| Element | Laparoscopic Illustration | Robotic Illustration |
|---|---|---|
| Instrument control | Manual, surgeon-held at bedside | Console-controlled, patient-side robotic arms |
| Range of motion shown | Limited pivot around fixed port | Wristed, multi-axis articulation |
| Typical viewpoint | Single laparoscope camera angle | Console view plus patient-side cart view |
| Common diagram type | Port placement, cross-section | Docking diagram, arm/instrument schematic |
| Primary audience | Surgical residents, patients | Device teams, hospital marketing, credentialing programs |
| Complexity of rendering | Moderate | High (multiple linked components) |
Core Elements of Effective Minimally Invasive Surgery Illustration
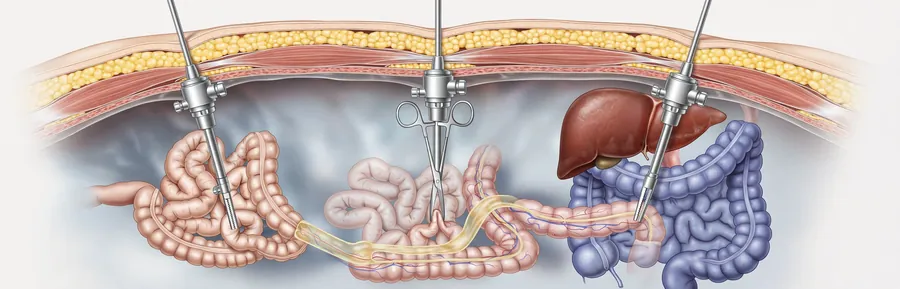
Regardless of whether a project is laparoscopic or robotic, certain elements consistently separate a clinically useful diagram from a merely decorative one:
- Anatomical accuracy verified against current references, not stylized approximations
- Correct instrument scale, since laparoscopic and robotic tools have standardized diameters that viewers with clinical backgrounds will immediately scrutinize
- Clear labeling and callouts that don’t obscure the anatomy being explained
- Consistent color coding across a series (for example, always shading the same organ the same tone across an entire procedural sequence)
- Depth cues, such as layered shading or partial transparency, to show instrument position relative to underlying structures
- Alignment with the intended output, whether that’s a print journal figure, a patient handout, or an interactive training module
Step-by-Step: How a Minimally Invasive Surgery Illustration Gets Made
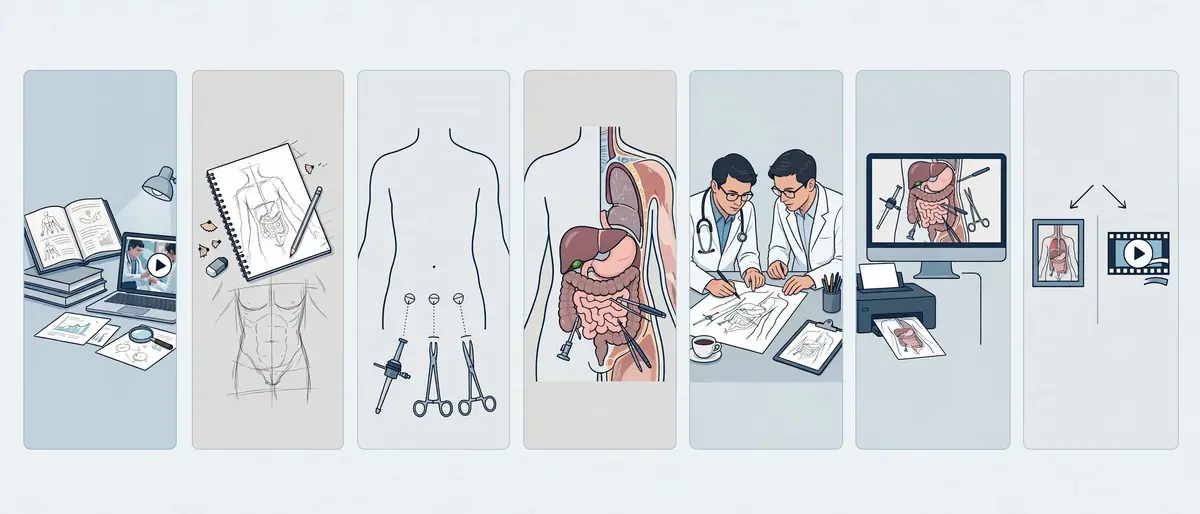
- Procedure research and reference gathering. The illustrator reviews surgical literature, operative videos, and often consults directly with a surgeon or medical writer to confirm sequence and terminology.
- Rough anatomical layout. A base anatomical structure is sketched first, establishing correct proportions before any instruments are added.
- Instrument and port placement. Trocars, ports, or robotic arms are positioned according to standard technique, cross-checked against the specific procedure variant being illustrated.
- Cross-section or cutaway integration. Where internal detail is needed, the artist blends a cutaway view with the external or endoscopic perspective.
- Labeling and callout design. Text elements are added in a way that supports, rather than competes with, the visual hierarchy.
- Clinical or editorial review. A subject-matter expert checks the draft for technical accuracy before final rendering.
- Final rendering and file delivery. The finished artwork is exported in the formats needed – typically vector EPS or AI files for print, alongside high-resolution PNG or JPG for digital use.
This is also the stage where teams decide whether a static diagram is sufficient or whether the procedure would communicate better as a short animated sequence; that decision often comes down to understanding how static illustration and full motion medical animation serve different learning goals.
Common Mistakes in Minimally Invasive Surgery Illustration
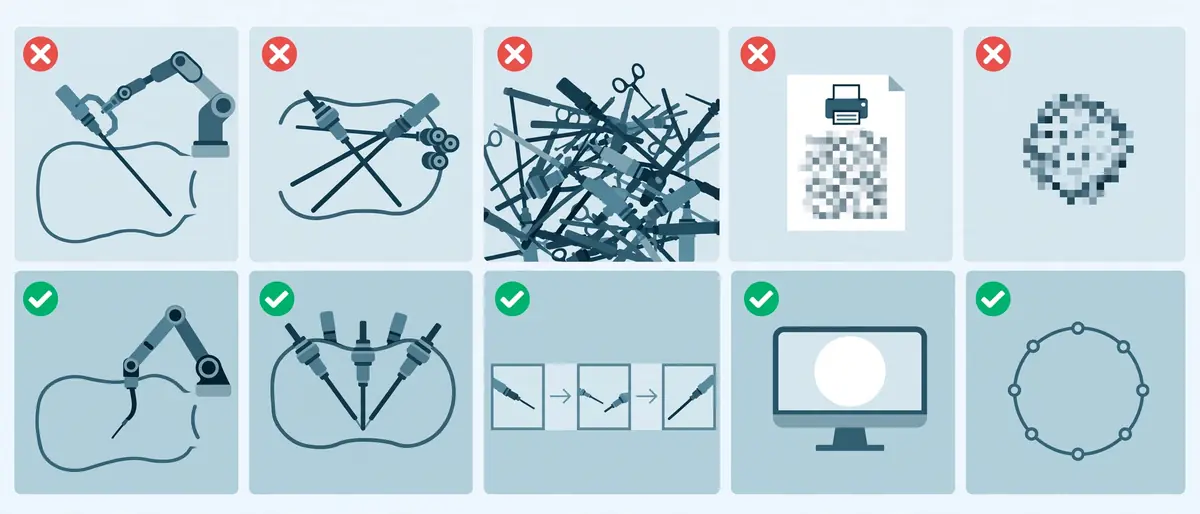
Even experienced teams run into recurring pitfalls when commissioning or producing MIS artwork:
- Treating laparoscopic and robotic instruments as visually interchangeable. Their range of motion, wrist articulation, and scale differ meaningfully, and swapping references between the two produces diagrams that trained viewers immediately flag as inaccurate.
- Skipping clinical review before finalizing artwork. Stylistic polish cannot compensate for an incorrect port placement or a surgically implausible instrument angle.
- Overloading a single image with too many procedural steps. MIS procedures often need to be broken into a sequence rather than compressed into one crowded diagram.
- Ignoring output-specific formatting requirements. A figure destined for journal submission has very different resolution, color mode, and labeling conventions than one built for a hospital website or a patient brochure.
- Underestimating file format needs. Print publishers, in particular, frequently require editable vector files rather than flattened raster images, and discovering this late in the process causes unnecessary rework.
Expert Tips for Commissioning Minimally Invasive Surgery Illustration

- Share the exact procedural variant, not just the general surgery name; laparoscopic cholecystectomy alone has several accepted port configurations, and specificity avoids revision cycles later.
- Provide operative video or photographs when available, even if imperfect, since they anchor the illustrator’s instrument angles and anatomical framing.
- Decide early whether the deliverable needs to support both print and digital use, since this affects color mode, resolution, and file format planning from the start.
- Request a single review round focused purely on clinical accuracy before moving into stylistic refinement, which keeps feedback organized and reduces total revisions.
- If the material will also support patient-facing education materials, ask whether a simplified companion version of the technical diagram is needed, since clinical and patient audiences rarely need identical levels of detail.
Applications Across Education, Publishing, and Patient Communication
Minimally invasive surgery illustration supports several distinct but overlapping audiences, and the same underlying procedure often needs more than one visual treatment depending on who’s viewing it.

Medical education and residency training relies heavily on step-by-step procedural diagrams that break laparoscopic or robotic techniques into teachable stages, often paired with simulation modules or surgical atlases.
Academic and scientific publishing requires figures that meet strict journal formatting standards, including specific resolution, labeling conventions, and file formats; many publishers now expect illustrations submitted according to formal author guidelines for medical and scientific journals before a manuscript is even accepted for review.
Device manufacturers and marketing teams use robotic and laparoscopic illustration to explain instrument capabilities to hospital purchasing committees, often relying on the same underlying anatomical and mechanical accuracy as a training diagram, just styled for a commercial audience.
Patient consent and education materials require a simplified, less technical treatment of the same procedure, since the goal shifts from procedural precision to general understanding and informed consent.
For teams building out any of these use cases, browsing prior illustration case studies and project breakdowns is often the fastest way to calibrate expectations before a formal brief.
File Formats and Delivery: What to Request
| Use Case | Recommended Format | Notes |
|---|---|---|
| Journal submission | Vector EPS/AI, high-res TIFF | Must meet specific journal DPI and color mode rules |
| Website or blog use | PNG, WebP, optimized JPG | Compressed for page speed without losing legibility |
| Print brochures | Vector EPS/AI, CMYK | Editable files needed for future updates |
| Training/simulation software | Layered PSD, vector source files | Allows components to be isolated or animated later |
| Patient consent handouts | PDF, print-ready PNG | Simplified labeling, larger type sizes |
Because so many of these use cases require the same base illustration delivered in different formats, requesting vector-based artwork in AI and EPS formats from the outset saves significant rework later, since vector files scale cleanly across print, digital, and presentation contexts without quality loss.
Frequently Asked Questions
What is minimally invasive surgery illustration used for?
Minimally invasive surgery illustration is used across medical education, academic publishing, device marketing, and patient consent materials to visually explain laparoscopic and robotic procedures that would otherwise be difficult to understand from camera footage alone.
How is robotic surgery illustration different from laparoscopic illustration?
Robotic surgery illustration must account for wristed instrument articulation and a console-to-patient-side arrangement, while laparoscopic illustration focuses on manually operated instruments with more limited, port-constrained movement.
What file format should I request for a surgical journal submission?
Most academic journals require vector formats such as EPS or AI, or high-resolution TIFF files, along with specific color mode and resolution requirements outlined in their author guidelines.
Can the same illustration be used for both clinical training and patient education?
Generally no; clinical and training audiences need full procedural detail, while patient-facing versions typically require simplified labeling and reduced technical complexity for informed consent purposes.
How long does a typical minimally invasive surgery illustration project take?
Timelines vary by complexity, but a single diagram often takes several days once reference materials and procedural details are confirmed, while multi-step sequences or full training sets take considerably longer.
Do I need a surgeon to review the illustration before publishing?
Yes, clinical review by a surgeon or subject-matter expert is strongly recommended before finalizing any minimally invasive surgery illustration intended for publication, training, or patient use, since even minor inaccuracies in instrument angle or anatomical placement can undermine credibility.
Conclusion

Minimally invasive surgery illustration sits at the intersection of surgical technique, mechanical accuracy, and visual communication, and getting it right requires more than general medical illustration skill – it requires direct familiarity with how laparoscopic ports and robotic arms actually move. Whether the end goal is a journal figure, a resident training module, a device marketing asset, or a patient consent handout, the underlying diagram needs to hold up under expert scrutiny while still communicating clearly to its intended audience. If your team is planning a laparoscopic or robotic procedure diagram set, request a custom minimally invasive surgery illustration project to get anatomically accurate, publication-ready artwork built around your exact procedural specifications.